Auto Part Number
Overview
Auto Part Number automates the assignment of piece marks and part numbers to component files in your Inventor assembly. It can replace the component Part Number or assign a custom iProperty Part Number, depending on your workflow. You provide a part number prefix, starting index, and number of digits for each part number, ensuring consistency and clarity across your project.
Selection can be based on all components in the current assembly, or only those within a selection set. To update all components, run the command with no selection active. To update only a subset, select the desired components and run the command. In both cases, all components and nested components with BOM structure set to Normal or Purchased will be assigned a part number.
Auto Part Number handles 'Normal' and 'Purchased' parts separately, allowing you to specify different prefixes for each. This flexibility supports a wide range of numbering schemes and project requirements.
When using Match Part Number, components are grouped by part number and all matching components are assigned the same number. This is useful for assemblies with duplicate parts or standardized components. If Match Part Number is not used, part numbers are assigned based on distinct file names, so each file receives a unique part number.
Part numbers can be assigned as Standard (replacing the existing part number), Custom (using a custom iProperty), or Both. Assigning custom part numbers is preferred for most workflows, as it does not overwrite existing part numbers and allows for more flexible data management.
How It Works
- Choose whether to process all components or only a selection set.
- Specify part number prefix, starting index, and number of digits.
- Decide if you want to use Standard, Custom, or Both part number types.
- Optionally, use Match Part Number to group components by part number.
- Run the command to assign part numbers to all eligible components and nested components.
Usage Instructions
- Open the target assembly.
- Optionally select specific components to process, or leave no selection to process all.
- Click the Auto Part Number button in the Configure panel.
- Fill in the dialog box: set prefixes, index, digits, and options for part number type and BOM type.
- Click OK to assign part numbers.
Troubleshooting
- If part numbers are not assigned, check BOM structure and selection set.
- Ensure prefixes and index values are correct.
- If rules are triggering unexpectedly, use the Suppress option to prevent rule execution during numbering.
Examples
- Assign part numbers to all components: Run the command with no selection to number every eligible component in the assembly.
- Assign part numbers to selected components: Select a subset of components and run the command to number only those parts.
- Use Match Part Number: Group components by part number so all matching parts receive the same number.
- Assign custom part numbers: Use the Custom option to store numbers in a custom iProperty without overwriting existing part numbers.
Dialog Box Input
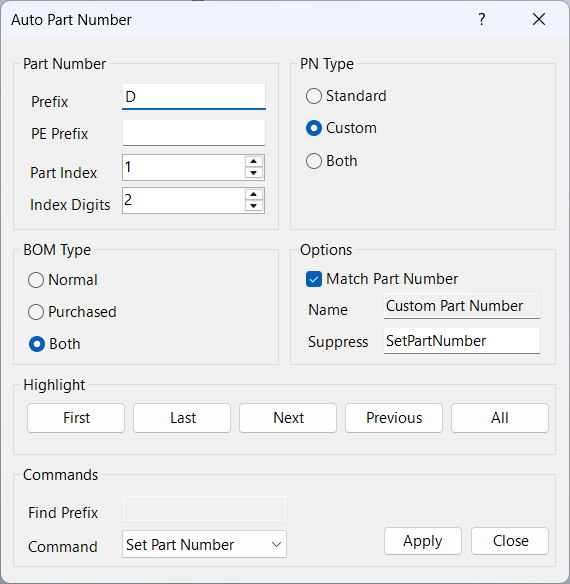
Part Number
Part Prefix is the prefix text entered before the index portion of the part number. This is optional and may be left blank.
PE Prefix is the prefix text entered before the index portion of the purchased part number. This is optional and may be left blank.
Part Index is the numeric portion of the part number following the prefix. The index is the first index assigned to the part numbers and is incremented each time a part number is assigned.
Index Digits are the number of digits in the part number index.
PN Type
Standard Part Number
Standard Part Numbers replace the existing component part numbers.
Each component file within the assembly (or selection) whose default BOM structure is set to Normal or Purchased is assigned a part number. Using this method of assigning numbers overwrites the existing part numbers, so you must ensure this is the desired result prior to running.
Custom Part Number
Assigning custom part numbers is the preferred method because it does not overwrite existing part numbers. Custom numbers are custom iProperties that are assigned part numbers based on distinct files or matching part numbers.
Both
Both Standard Part Number and Custom Part Number's will be updated.
BOM Type
Normal assigns part numbers to all components with BOM structure set to Normal.
Purchased assigns part numbers to all components with BOM structure set to Purchased.
Both assigns part numbers to both Normal and Purchased components.
Custom Part Options
Match Part Number
When assigning part numbers with Match Part Number, components are grouped by part number and all components with matching part numbers are assigned the same number. This is useful if you have multiple component files that all have the same part number, such as when using automatic part numbering.
When Match Part Numbering is not used, part numbers are assigned based on distinct file name. Each file will receive a different part number.
Custom Name
This is the custom iProperty name that is used to store custom part numbers. See Custom Part Number Name
Suppress
This is the name of a rule you would like to suppress while assigning part numbers. This is done to prevent a rule from automatically triggering while assigning numbers. To suppress all rules in the components, enter an asterisk * for the rule name.
Commands
Set Part Number assigns a new part number by combining the part prefix and part index
Update Prefix assigns a new prefix to the part replacing the old prefix if it had one
Delete Prefix removes the prefix, if any, from the part number
Replace Prefix replaces the existing prefix with the new prefix; only if the existing prefix matches Find Prefix